
ACP Planner
In Starry Night) |
In TheSky) |
ACP Planner™ (Patent Pending) gives you a visual way to create a night's multiple target observing plan within Starry Night or TheSky. This way of planning is a quantum leap beyond other tools and automation systems because it lets you visualize your target positions and timing together dynamically and do task-oriented planning. It makes it very easy (and very fast!) to pick which targets to image at what times and for how long. There's no need to tell ACP to slew, take images, focus, guide, etc., because it's smart enough to figure out what things are needed and when. An ACP plan is just a list of targets with image/filter specs and optional timing info.
We have produced some videos that include a series on Planner that should help you get that "ah ha!" experience when you discover what ACP Planner does for the planning process:
You can also download and use ACP Planner free of charge:
ACP Planner is designed to be independent of ACP. It can be run on any Windows computer. However, if ACP is installed, it will offer to start your plan for you when you're finished with it (assuming your observatory, ACP, MaxIm, etc. are ready to run!).
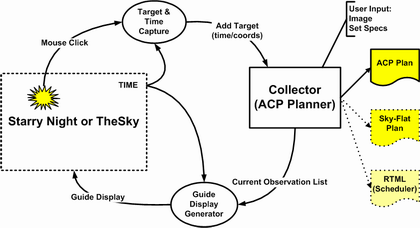
How it Works
Whether you use Starry Night or TheSky, ACP Planner works in basically the same way. You work in the planetarium, selecting targets to observe, and these are added to the "collector". As you add targets, you also specify the images to be taken. ACP Planner constantly recomputes the time needed to observe each target in the collector's list.
As you roll time back and forth (using the mouse wheel or Starry Night's Graph tool), targets move across the sky and a "guide display" tells you whether there's an active observation at the time, or how long it will be until the next observation will start, or that the remainder of the night is free. Thus, you can easily visualize which targets are in a favorable position at what times, how much time is available to insert a target between ones already selected, or start a new one at the end of the list.
When you're finished adding targets and setting up observations, simply save the observing plan (File/Save As...). At this point, if you have ACP installed, and it is ready for automated imaging, you can have your plan started automatically. Or you can save it for later running or uploading to a remote ACP observatory. Load the Plan into ACP or upload it to the remote ACP-based observatory and start it. That's all there is to it!
Here's a diagram that shows how the pieces fit together.
Copyright © 2000-2014, Robert B. Denny of Mesa, Arizona. All rights reserved.